ICT战队-第8次笔记
[toc]
实验一:路由策略(防止次优路径)
注:
1.路由注入、路由引入、路由重分发一个东西,都是让两个不同的路由协议互相学习对方的路由条目
2.多点双向重分发(多个边界路由器做了路由引入)容易引起次优路径和路由环路等情况,所以要注意防环
3.在哪配置?:让B协议学习A协议(路由条目),就进入B协议配置路由引入
4.不同路由协议之间的好坏比较优先级,相同路由协议之间比较cost
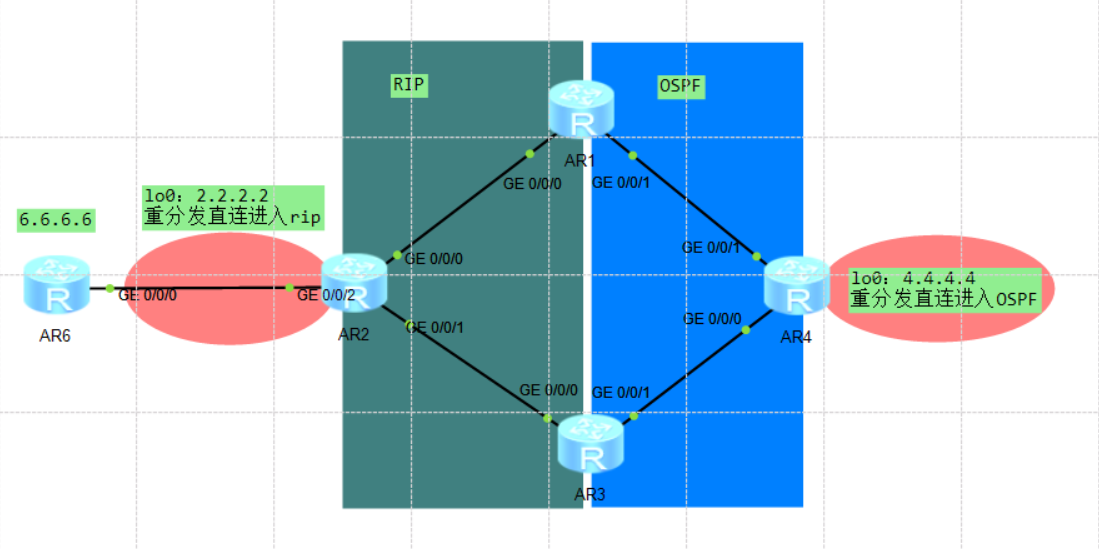
- STEP1.0:网络拓扑
直接打开老师的拓扑(虽然但是,老师的拓扑没有完全配置好,所以打开拓扑后还要再配置一下)

- STEP1.1:AR2配置环回口
# todo AR2:配置环回口地址
[R2]int lo 0
[R2-LoopBack0]ip add 2.2.2.2 32- STEP1.2:AR2配置路由引入
# todo AR2:配置路由引入
[R2]rip
[R2-rip-1]
[R2-rip-1]import-route ?
  bgp     Border Gateway Protocol (BGP) routes
  direct  Direct routes
  isis    Intermediate System to Intermediate System (ISIS) routes
  ospf    Open Shortest Path First (OSPF) routes
  rip     Routing Information Protocol (RIP) routes
  static  Static routes
  unr     User Network Route
[R2-rip-1]import-route direct ?
  cost          Cost of the import route
  route-policy  Apply the specified route policy to filter route
  <cr>          Please press ENTER to execute command
[R2-rip-1]import-route direct- STEP1.3:删除多余配置
# todo AR1:删除路由引入配置
[R1]rip  # 进入RIP
[R1-rip-1]un import-route ospf  # 删除对OSPF的路由引入
[R1-rip-1]ospf  # 进入OSPF
[R1-ospf-1]un import-route rip  # 删除对RIP的路由引入
# todo AR3:删除路由引入配置
[R3]rip  # 进入RIP
[R3-rip-1]un import-route ospf  # 删除对OSPF的路由引入
[R3-rip-1]ospf  # 进入OSPF
[R3-ospf-1]un import-route rip # 删除对RIP的路由引入- STEP1.4:查看路由表
边界路由器AR1和AR3都有2.2.2.2和4.4.4.4两个环回地址,但是区域内路由器AR2和AR4只有自己的环回地址
# todo AR1:查看路由表
[R1]dis ip rou
Route Flags: R - relay, D - download to fib
------------------------------------------------------------------------------
Routing Tables: Public
         Destinations : 14       Routes : 14
Destination/Mask    Proto   Pre  Cost      Flags NextHop         Interface
        2.2.2.2/32  RIP     100  1           D   12.1.1.2        GigabitEthernet0/0/0
        4.4.4.0/24  O_ASE   150  1           D   14.1.1.4        GigabitEthernet0/0/1
        ······

# todo AR2:查看路由表
[R2]dis ip rou
Route Flags: R - relay, D - download to fib
------------------------------------------------------------------------------
Routing Tables: Public
         Destinations : 11       Routes : 11
Destination/Mask    Proto   Pre  Cost      Flags NextHop         Interface
        2.2.2.2/32  Direct  0    0           D   127.0.0.1       LoopBack0
        ······

# todo AR3:查看路由表
[R3]dis ip rou
Route Flags: R - relay, D - download to fib
------------------------------------------------------------------------------
Routing Tables: Public
         Destinations : 14       Routes : 14
Destination/Mask    Proto   Pre  Cost      Flags NextHop         Interface
        2.2.2.2/32  RIP     100  1           D   23.1.1.2        GigabitEthernet0/0/0
        4.4.4.0/24  O_ASE   150  1           D   34.1.1.4        GigabitEthernet0/0/1
        ······

# todo AR4:查看路由表
[R4]dis ip rou
Route Flags: R - relay, D - download to fib
------------------------------------------------------------------------------
Routing Tables: Public
         Destinations : 13       Routes : 13
Destination/Mask    Proto   Pre  Cost      Flags NextHop         Interfaces
        4.4.4.0/24  Direct  0    0           D   4.4.4.4         LoopBack0
······- STEP2.0:一个ABR配置路由引入
# todo AR1:配置路由引入
[R1]rip
[R1-rip-1]import-route ospf
[R1-rip-1]ospf
[R1-ospf-1]import-route rip- STEP2.1:查看路由表
AR1路由表不变,AR2和AR4路由表增加了对方环回地址的路由条目,AR3到4.4.4.4的路由条目改变,因为RIP比O_ASE的优先级更低(越低越优先)
# todo AR1:查看路由表
[R1-ospf-1]dis ip rou
Route Flags: R - relay, D - download to fib
------------------------------------------------------------------------------
Routing Tables: Public
         Destinations : 14       Routes : 14
Destination/Mask    Proto   Pre  Cost      Flags NextHop         Interface
        2.2.2.2/32  RIP     100  1           D   12.1.1.2        GigabitEthernet0/0/0
        4.4.4.0/24  O_ASE   150  1           D   14.1.1.4        GigabitEthernet0/0/1
        ······

# todo AR2:查看路由表
<R2>dis ip rou
Route Flags: R - relay, D - download to fib
------------------------------------------------------------------------------
Routing Tables: Public
         Destinations : 14       Routes : 14
Destination/Mask    Proto   Pre  Cost      Flags NextHop         Interface
        2.2.2.2/32  Direct  0    0           D   127.0.0.1       LoopBack0
        4.4.4.0/24  RIP     100  1           D   12.1.1.1        GigabitEthernet0/0/0
        ······

# todo AR3:查看路由表
[R3-rip-1]dis ip rou
Route Flags: R - relay, D - download to fib
------------------------------------------------------------------------------
Routing Tables: Public
         Destinations : 14       Routes : 14
Destination/Mask    Proto   Pre  Cost      Flags NextHop         Interface
        2.2.2.2/32  RIP     100  1           D   23.1.1.2        GigabitEthernet0/0/0
        4.4.4.0/24  RIP     100  2           D   23.1.1.2        GigabitEthernet0/0/0
        ······

# todo AR4:查看路由表
<R4>dis ip rou
Route Flags: R - relay, D - download to fib
------------------------------------------------------------------------------
Routing Tables: Public
         Destinations : 16       Routes : 16
Destination/Mask    Proto   Pre  Cost      Flags NextHop         Interface
        2.2.2.2/32  O_ASE   150  1           D   14.1.1.1        GigabitEthernet0/0/1
        4.4.4.0/24  Direct  0    0           D   4.4.4.4         LoopBack0
······- STEP2.2:另一个ABR配置路由引入
[R3]rip
[R3-rip-1]import-route ospf
[R3-rip-1]ospf
[R3-ospf-1]import-route rip- STEP2.3:查看路由表(略)
AR1和AR3路由表不变,AR2和AR4路由表增加了负载均衡的路由条目
为什么AR3不学习更优路径?
因为OSPF重分发后,优先级变成3类LSA的150,比优先级为100的RIP更大,根据越小越优先,所以选择RIP。而且RIP有水平分割(默认开启),AR3从AR2中学习到的4.4.4.4不会再发送更新给AR2。
AR4发更新给AR1和AR3,这俩再发给AR2,此时AR2就有负载均衡的路由条目
此时再开启AR3的路由引入,无法更新更优的路径,因为已经存在一条路径
- STEP3.0:AR3配置路由策略
路由策略配置思路:ACL嵌套到路由策略中,路由策略再被OSPF等协议调用
例AR3:【除了策略路由里面的优先级设为99,其他优先级全部设为150(默认),即把优先级默认设置为150,4.4.4.0设置为99】
设置ACL规则:1.匹配4.4.4.0,2.拒绝其他网段
路由策略选择响应ACL,并优先级设置为99
路由策略有两个动作:match和apply
只要不match就是match any
# show 命令:查看ACL和路由策略
dis acl all
dis route-policy
ACL步长5自增,而路由策略node值必须手写
# todo AR3:配置ACL
[R3]acl 2000
[R3-acl-basic-2000]rule permit source 4.4.4.0 0.0.0.244
[R3-acl-basic-2000]rule deny

# todo AR3:配置路由策略
[R3]route-policy ciyou permit node 10  # 路由策略名字随便取,但是一定要记得
Info: New Sequence of this List.
[R3-route-policy]if-match acl 2000  # 路由策略匹配4.4.4.0的地址
[R3-route-policy]apply preference 99  # 设置优先级为99
[R3-route-policy]ospf
[R3-ospf-1]preference ase route-policy ciyou 150  # 设置优先级:路由策略中的为99,其余为150(默认,不写也行)

# todo AR3:查看完整配置
[R3-ospf-1]dis th
[V200R003C00]
#
ospf 1
 import-route rip 1
 preference ase route-policy ciyou 150
 area 0.0.0.0
  network 34.1.1.0 0.0.0.255
#
return- STEP3.1:查看路由表
# todo AR1:查看路由表
[R1-rip-1]dis ip rou
Route Flags: R - relay, D - download to fib
------------------------------------------------------------------------------
Routing Tables: Public
         Destinations : 14       Routes : 14
Destination/Mask    Proto   Pre  Cost      Flags NextHop         Interface
        2.2.2.2/32  RIP     100  1           D   12.1.1.2        GigabitEthernet0/0/0
        4.4.4.0/24  O_ASE   150  1           D   14.1.1.4        GigabitEthernet0/0/1
        ······

# todo AR3:查看路由表
[R3-ospf-1]dis ip rou
Route Flags: R - relay, D - download to fib
------------------------------------------------------------------------------
Routing Tables: Public
         Destinations : 16       Routes : 16
Destination/Mask    Proto   Pre  Cost      Flags NextHop         Interface
        2.2.2.2/32  RIP     100  1           D   23.1.1.2        GigabitEthernet0/0/0
        4.4.4.0/24  O_ASE   99   1           D   34.1.1.4        GigabitEthernet0/0/1
        ······
此时暂时没有次优路径,但是如果AR1和AR2断开再重连,就可能出现次优路径了,因为如果AR1先发送更新给AR2,那就没有问题;如果AR3先发送更新给AR2,就出现次优路径,所以还要配置AR1。
- STEP3.2:AR1配置路由策略
# todo AR1:配置ACL
[R1]acl 2000
[R1-acl-basic-2000]rule permit source 4.4.4.0 0.0.0.255
[R1-acl-basic-2000]rule deny

# todo AR1:配置路由策略
[R1]route-policy cy-rip permit node 10  # 路由策略
Info: New Sequence of this List.
[R1-route-policy]if-match acl 2000
[R1-route-policy]apply preference 151
[R1-route-policy]rip
[R1-rip-1]preference route-policy cy-rip 100  # 默认100

# todo AR1:查看完整配置
[R1-rip-1]dis th
[V200R003C00]
#
rip 1
 undo summary
 version 2
 network 12.0.0.0
 preference route-policy cy-rip  # 默认100
 import-route ospf 1
#
return- STEP3.3:查看路由表
# todo AR1:查看路由表
[R1-rip-1]dis ip rou
Route Flags: R - relay, D - download to fib
------------------------------------------------------------------------------
Routing Tables: Public
         Destinations : 14       Routes : 14
Destination/Mask    Proto   Pre  Cost      Flags NextHop         Interface
        2.2.2.2/32  RIP     100  1           D   12.1.1.2        GigabitEthernet0/0/0
        4.4.4.0/24  O_ASE   150  1           D   14.1.1.4        GigabitEthernet0/0/1
        ······

# todo AR3:查看路由表
<R3>dis ip rou
Route Flags: R - relay, D - download to fib
------------------------------------------------------------------------------
Routing Tables: Public
         Destinations : 14       Routes : 14
Destination/Mask    Proto   Pre  Cost      Flags NextHop         Interface
        2.2.2.2/32  RIP     100  1           D   23.1.1.2        GigabitEthernet0/0/0
        4.4.4.0/24  O_ASE   99   1           D   34.1.1.4        GigabitEthernet0/0/1
······实验二:路由过滤(防止引入环路)
路由过滤:重分发RIP进入OSPF的条目不会再从OSPF进入RIP
打标:过滤特定标签
- STEP1.0:网络拓扑
- STEP1.1:查看配置
dis cur con rip
dis ip int bri- STEP1.2:AR6配置重分发
# todo AR6:配置重分发
[R6]rip  # 进入RIP
[R6-rip-1]import-route direct cost 4 # 路由引入,设置cost为4- STEP1.3:AR2查看路由表
本来AR2到6.6.6.6应该是直连,但是AR2把更新发送给AR3,AR3发给AR4,AR发给AR1,AR1发给AR2,最终AR2到6.6.6.6的下一跳变成了AR1,即12.1.1.1,这样就形成了路由环路。
# todo AR2:查看路由表
<R2>dis ip rou
Route Flags: R - relay, D - download to fib
------------------------------------------------------------------------------
Routing Tables: Public
         Destinations : 17       Routes : 20
Destination/Mask    Proto   Pre  Cost      Flags NextHop         Interface
        4.4.4.0/24  RIP     100  1           D   12.1.1.1        GigabitEthernet0/0/0
                    RIP     100  1           D   23.1.1.3        GigabitEthernet0/0/1
        6.6.6.6/32  RIP     100  1           D   12.1.1.1        GigabitEthernet0/0/0
······- STEP1.4:测试路由环路
# todo AR2:测试路由环路
<R2>tracert 6.6.6.6
 traceroute to  6.6.6.6(6.6.6.6), max hops: 30 ,packet length: 40,press CTRL_C to break
 1 12.1.1.1 20 ms  20 ms  30 ms
 2 14.1.1.4 20 ms  20 ms  30 ms
 3 34.1.1.3 30 ms  30 ms  30 ms
 4 23.1.1.2 40 ms  20 ms  20 ms
······
27 34.1.1.3 120 ms  140 ms  110 ms
28 23.1.1.2 140 ms  130 ms  130 ms
29 12.1.1.1 150 ms  140 ms  130 ms
30 14.1.1.4 120 ms  140 ms  150 ms
<R2>- STEP1.5:配置路由过滤思路
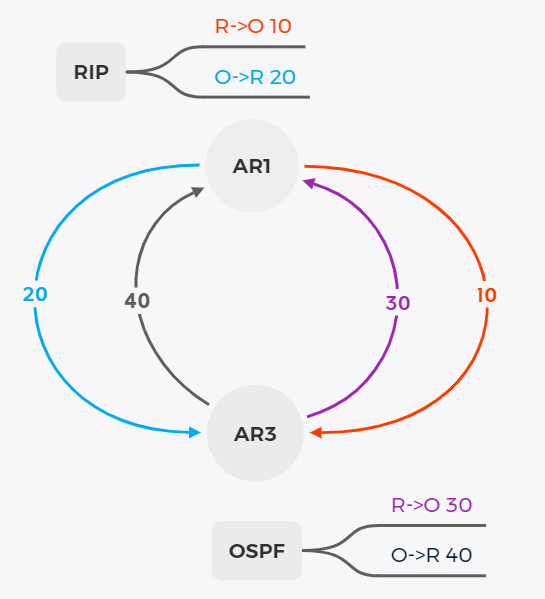
- STEP2.0:AR1配置路由过滤策略
# todo AR1:路由策略
[R1]route-policy r-o deny node 10  # RIP->OSPF
Info: New Sequence of this List.
[R1-route-policy]if-match tag 40  # deny if-match
[R1-route-policy]q

[R1]route-policy r-o permit node 20  # RIP->OSPF
Info: New Sequence of this List.
[R1-route-policy]apply tag 10  # permit apply
[R1-route-policy]q

[R1]route-policy o-r deny node 10  # OSPF->RIP
Info: New Sequence of this List.
[R1-route-policy]if-match tag 30  # deny if-match
[R1-route-policy]q

[R1]route-policy o-r permit node 20  # OSPF->RIP
Info: New Sequence of this List.
[R1-route-policy]apply tag 20  # permit apply
[R1-route-policy]q- STEP2.1:AR1配置区域启动路由过滤策略
# todo AR1:配置区域启动路由过滤策略
[R1]rip
[R1-rip-1]import-route ospf route-policy o-r
[R1-rip-1]ospf
[R1-ospf-1]import-route rip route-policy r-o- STEP2.2:查看路由特定路由条目详细信息
命令:dis ip rou [特定地址] verbose
# todo AR2:查看4.4.4.0条目信息
<R2>dis ip rou 4.4.4.0 ver
Route Flags: R - relay, D - download to fib
------------------------------------------------------------------------------
Routing Table : Public
Summary Count : 2

Destination: 4.4.4.0/24
     Protocol: RIP              Process ID: 1
   Preference: 100                    Cost: 1
      NextHop: 12.1.1.1          Neighbour: 12.1.1.1
        State: Active Adv              Age: 00h02m14s
          Tag: 20                 Priority: low
        Label: NULL                QoSInfo: 0x0
   IndirectID: 0x0
 RelayNextHop: 0.0.0.0           Interface: GigabitEthernet0/0/0
     TunnelID: 0x0                   Flags:  D

Destination: 4.4.4.0/24
     Protocol: RIP              Process ID: 1
   Preference: 100                    Cost: 1
      NextHop: 23.1.1.3          Neighbour: 23.1.1.3
        State: Active Adv              Age: 00h46m47s
          Tag: 1                  Priority: low
        Label: NULL                QoSInfo: 0x0
   IndirectID: 0x0
 RelayNextHop: 0.0.0.0           Interface: GigabitEthernet0/0/1
TunnelID: 0x0 Flags: D- STEP2.3:AR3配置路由过滤策略
# todo AR3:配置路由过滤策略
[R3]route-policy r-o deny node 10  # RIP->OSPF
Info: New Sequence of this List.
[R3-route-policy]if-match tag 20  # deny if-match
[R3-route-policy]q

[R3]route-policy r-o permit node 20  # RIP->OSPF
Info: New Sequence of this List.
[R3-route-policy]apply tag 30  # permin apply
[R3-route-policy]q

[R3]route-policy o-r deny node 10  # OSPF->RIP
Info: New Sequence of this List.
[R3-route-policy]if-match tag 10  # deny if-match
[R3-route-policy]q

[R3]route-policy o-r permit node 20  # OSPF->RIP
Info: New Sequence of this List.
[R3-route-policy]apply tag 40  # permin apply
[R3-route-policy]q- STEP2.4:AR3配置区域启动路由过滤策略
[R3]rip
[R3-rip-1]import-route ospf route-policy o-r
[R3-rip-1]ospf
[R3-ospf-1]import-route rip route-policy r-o
最后最好自己写一个默认策略。
作业: 实验用了两个路由策略解决路由环路,若只用一个路由策略怎么解决?
实验三:前缀列表(路由路径控制)
前缀列表作用:过滤
实验三$_1$
实验目的:过滤掉192.168.1.1/32,保留192.168.1.0/25
- STEP1.0:网络拓扑
直接打开老师的网络拓扑(配置不全,其实好像没影响…)
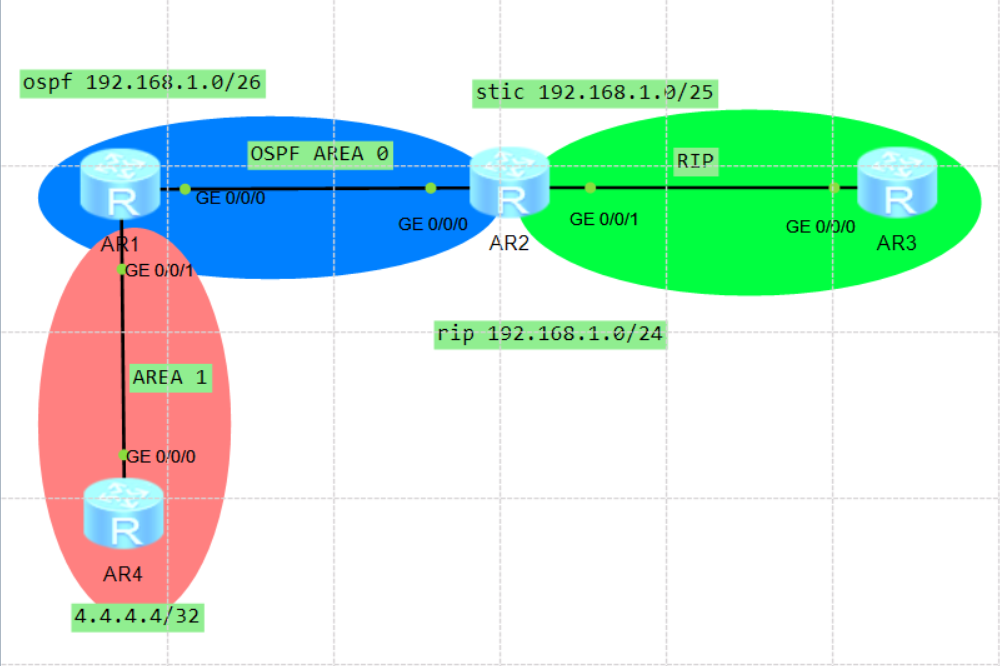
- STEP1.1:完善配置(其实好像应该不用配…)
# todo AR1:修改OSPF网络类型
[R1]int lo 0
[R1-LoopBack0]ospf network-type broadcast - STEP1.2:查看路由表
# todo AR3:查看路由表
<R3>dis ip rou
Route Flags: R - relay, D - download to fib
------------------------------------------------------------------------------
Routing Tables: Public
         Destinations : 12       Routes : 12
Destination/Mask    Proto   Pre  Cost      Flags NextHop         Interface
        4.4.4.4/32  RIP     100  1           D   23.1.1.2        GigabitEthernet0/0/0
       12.1.1.0/24  RIP     100  1           D   23.1.1.2        GigabitEthernet0/0/0
       14.1.1.0/24  RIP     100  1           D   23.1.1.2        GigabitEthernet0/0/0
       23.1.1.0/24  Direct  0    0           D   23.1.1.3        GigabitEthernet0/0/0
       23.1.1.3/32  Direct  0    0           D   127.0.0.1       GigabitEthernet0/0/0
     23.1.1.255/32  Direct  0    0           D   127.0.0.1       GigabitEthernet0/0/0
      127.0.0.0/8   Direct  0    0           D   127.0.0.1       InLoopBack0
      127.0.0.1/32  Direct  0    0           D   127.0.0.1       InLoopBack0
127.255.255.255/32  Direct  0    0           D   127.0.0.1       InLoopBack0
    192.168.1.0/25  RIP     100  1           D   23.1.1.2        GigabitEthernet0/0/0
    192.168.1.1/32  RIP     100  1           D   23.1.1.2        GigabitEthernet0/0/0
255.255.255.255/32 Direct 0 0 D 127.0.0.1 InLoopBack0路由表中有192.168.1.0/25和192.168.1.1/32
- STEP2.0:AR3使用路由过滤策略进行路由路径控制
# todo AR3:配置ACL
[R3]acl 2000
[R3-acl-basic-2000]rule deny source 192.168.1.0 0.0.0.63
[R3-acl-basic-2000]rule permit
[R3-acl-basic-2000]q

# todo AR3:配置RIP路由过滤策略
[R3]rip
[R3-rip-1]filter-policy ?
  INTEGER<2000-2999>  Apply basic ACL
  acl-name            Specify IP Access Control List (ACL) name for filtering
                      routes
  gateway             Filter routes based on the distributing gateway
  ip-prefix           Specify IP prefix for filtering routes
[R3-rip-1]filter-policy 2000 ?
  export  Specify an export policy
  import  Specify an import policy
[R3-rip-1]filter-policy 2000 import - STEP2.1:查看路由表
# todo AR3:查看路由表
[R3-rip-1]dis ip rou
Route Flags: R - relay, D - download to fib
------------------------------------------------------------------------------
Routing Tables: Public
         Destinations : 10       Routes : 10
Destination/Mask    Proto   Pre  Cost      Flags NextHop         Interface
        4.4.4.4/32  RIP     100  1           D   23.1.1.2        GigabitEthernet0/0/0
       12.1.1.0/24  RIP     100  1           D   23.1.1.2        GigabitEthernet0/0/0
       14.1.1.0/24  RIP     100  1           D   23.1.1.2        GigabitEthernet0/0/0
       23.1.1.0/24  Direct  0    0           D   23.1.1.3        GigabitEthernet0/0/0
       23.1.1.3/32  Direct  0    0           D   127.0.0.1       GigabitEthernet0/0/0
     23.1.1.255/32  Direct  0    0           D   127.0.0.1       GigabitEthernet0/0/0
      127.0.0.0/8   Direct  0    0           D   127.0.0.1       InLoopBack0
      127.0.0.1/32  Direct  0    0           D   127.0.0.1       InLoopBack0
127.255.255.255/32  Direct  0    0           D   127.0.0.1       InLoopBack0
255.255.255.255/32 Direct 0 0 D 127.0.0.1 InLoopBack0192.168.1.0/25和192.168.1.1/32都没有,过滤失败。
- STEP2.2:AR3配置前缀列表
ACL只能基于路由条目的网络号匹配,ACL只能过滤网路号
即只要地址匹配,不管掩码,全部按ACL规则进行接收/拒绝
所以,在进行路由条目分类不建议使用ACL
前缀列表:匹配网络号和掩码
通配符不能不掩码长度大
[R3]ip ip-prefix ?
  STRING<1-169>  Specify prefix-list name
[R3]ip ip-prefix dcm ?
  deny    Specify a deny rule
  index   Set the sequence number of this entry for IP prefix-list
  permit  Specify a permit rule
[R3]ip ip-prefix dcm deny ?
  IP_ADDR<X.X.X.X>  Specify IP-address
[R3]ip ip-prefix dcm deny 192.168.1.0 ?
  INTEGER<0-32>  Mask length
[R3]ip ip-prefix dcm deny 192.168.1.0 24 ?
  greater-equal  Set the greater-than-or-equal-to value of the mask length
  less-equal     Set the less-than-or-equal-to value of the mask length
  <cr>           Please press ENTER to execute command
[R3]ip ip-prefix dcm deny 192.168.1.0 24 greater-equal 26 less-equal 26
# 等价于[R3]ip ip-prefix dcm deny 192.168.1.0 26- STEP2.3:AR3查看路由表
# todo AR3:查看路由表
[R3-rip-1]dis ip rou
Route Flags: R - relay, D - download to fib
------------------------------------------------------------------------------
Routing Tables: Public
         Destinations : 11       Routes : 11
Destination/Mask    Proto   Pre  Cost      Flags NextHop         Interface
        4.4.4.4/32  RIP     100  1           D   23.1.1.2        GigabitEthernet0/0/0
       12.1.1.0/24  RIP     100  1           D   23.1.1.2        GigabitEthernet0/0/0
       14.1.1.0/24  RIP     100  1           D   23.1.1.2        GigabitEthernet0/0/0
       23.1.1.0/24  Direct  0    0           D   23.1.1.3        GigabitEthernet0/0/0
       23.1.1.3/32  Direct  0    0           D   127.0.0.1       GigabitEthernet0/0/0
     23.1.1.255/32  Direct  0    0           D   127.0.0.1       GigabitEthernet0/0/0
      127.0.0.0/8   Direct  0    0           D   127.0.0.1       InLoopBack0
      127.0.0.1/32  Direct  0    0           D   127.0.0.1       InLoopBack0
127.255.255.255/32  Direct  0    0           D   127.0.0.1       InLoopBack0
    192.168.1.0/25  RIP     100  1           D   23.1.1.2        GigabitEthernet0/0/0
255.255.255.255/32 Direct 0 0 D 127.0.0.1 InLoopBack0可以看到有192.168.1.0/25,没有192.168.1.1/32,说明成功过滤。
关于前缀列表过滤:
RIP随便过滤,OSPF不行,OSPF同一个区域必须保持一致,OSPF只能在进OSPF方向做过滤,即import,不能在出OSPF方向做过滤,即export,只把路由更新更新到数据库,但是不把路由更新加表
实验三$_2$
实验目的:过滤掉C类路由条目
OSPF重分发默认类型2,每经过路由器度量值不变
- STEP1.0:网络拓扑
直接打开老师的网络拓扑(未配置完全)
- STEP1.1:AR2配置重分发
# todo AR2:配置重分发
[R2]ospf
[R2-ospf-1]import-route rip
[R2-ospf-1]import-route direct- STEP1.2:查看路由表
# todo AR1:查看路由表
<R1>dis ip rou
Route Flags: R - relay, D - download to fib
------------------------------------------------------------------------------
Routing Tables: Public
         Destinations : 12       Routes : 12
Destination/Mask    Proto   Pre  Cost      Flags NextHop         Interface
       ······
    192.168.1.0/25  O_ASE   150  1           D   12.1.1.2        GigabitEthernet0/0/0
    192.168.1.0/26  Direct  0    0           D   192.168.1.1     LoopBack0
    192.168.1.1/32  Direct  0    0           D   127.0.0.1       LoopBack0
   192.168.1.63/32  Direct  0    0           D   127.0.0.1       LoopBack0
255.255.255.255/32 Direct 0 0 D 127.0.0.1 InLoopBack0有192.168.1.0/25这个非直连的C类地址
- STEP2.0:AR1配置前缀列表
# todo AR1:配置前缀列表
[R1]ip ip-prefix C deny 192.0.0.0 3 less-equal 32  # 前缀列表匹配拒绝C类地址
[R1]ip ip-prefix C permit 0.0.0.0 0 less-equal 32  # 前缀列表匹配默认策略(允许其他所有地址)
[R1]ospf  # 进入OSPF
[R1-ospf-1]filter-policy ip-prefix C import # 对进入的路由采取前缀列表过滤- STEP2.1:查看路由表
# todo AR1:查看路由表
[R1-ospf-1]dis ip rou
Route Flags: R - relay, D - download to fib
------------------------------------------------------------------------------
Routing Tables: Public
         Destinations : 13       Routes : 13
Destination/Mask    Proto   Pre  Cost      Flags NextHop         Interface
       ······
    192.168.1.0/26  Direct  0    0           D   192.168.1.1     LoopBack0
    192.168.1.1/32  Direct  0    0           D   127.0.0.1       LoopBack0
   192.168.1.63/32  Direct  0    0           D   127.0.0.1       LoopBack0
255.255.255.255/32 Direct 0 0 D 127.0.0.1 InLoopBack0没有192.168.1.0/25,成功过滤。(直连的C类地址无法过滤)
实验四:路径控制
华三、思科设备的配置思路:ACL -> PBR -> INTERFACE
华为设备的配置思路:
-> ACL(分类)
-> classifier(调用ACL分类)
-> behavior(动作)
-> policy(关联分类和动作)
-> 接口调用
一般路由器基于目的地址的路由表进行转发
策略路由基于源地址进行转发,基于策略进行转发
如果同时有策略路由和路由条目,先匹配策略路由(策略路由优先级高于路由条目),找不到再根据路由表转发
配置要求:
1、给CE路由器配置公网地址
2、R4通过DHCP获取ip地址
3、财务部4.4.4.4走电信,其他链路(192.168.1.254)走联通
- STEP1.0:网络拓扑
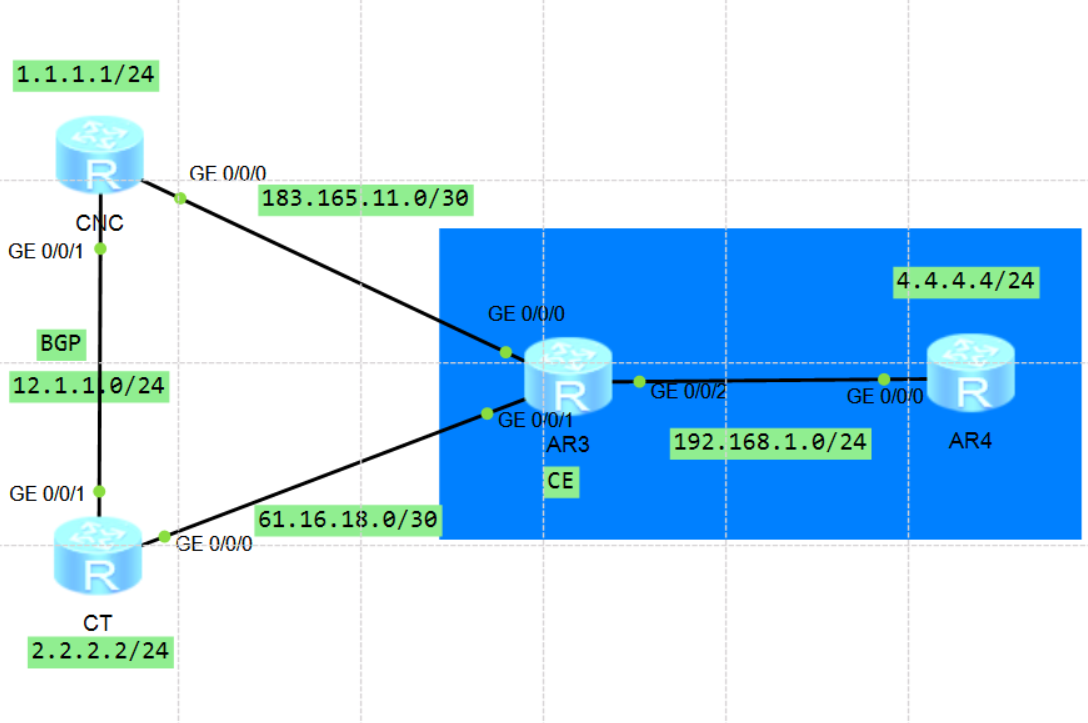
- STEP1.1:配置IP
# todo AR3:配置IP
[CE]dhcp en
Info: The operation may take a few seconds. Please wait for a moment.done.
[CE]int g0/0/0
[CE-GigabitEthernet0/0/0]ip add 183.165.11.2 30
[CE-GigabitEthernet0/0/0]int g0/0/1
[CE-GigabitEthernet0/0/1]ip add 61.16.18.2 30
[CE-GigabitEthernet0/0/1]int g0/0/2
[CE-GigabitEthernet0/0/2]ip add 192.168.1.1 24

# todo AR3:配置DHCP
[CE-GigabitEthernet0/0/2]dhcp select int
[CE-GigabitEthernet0/0/2]dhcp server dns-list 192.168.1.1 114.114.114.114
[CE-GigabitEthernet0/0/2]dis th
[V200R003C00]
#
interface GigabitEthernet0/0/2
 ip address 192.168.1.1 255.255.255.0
 dhcp select interface
 dhcp server dns-list 192.168.1.1 114.114.114.114
#
return

# todo AR4:配置DHCP获取IP地址
[R4]dhcp enable
Info: The operation may take a few seconds. Please wait for a moment.done.
[R4]int g0/0/0
[R4-GigabitEthernet0/0/0]ip add dhcp-alloc

# todo AR4:查看DHCP获取的地址
[R4-GigabitEthernet0/0/0]dis ip int bri
*down: administratively down
^down: standby
(l): loopback
(s): spoofing
The number of interface that is UP in Physical is 2
The number of interface that is DOWN in Physical is 2
The number of interface that is UP in Protocol is 2
The number of interface that is DOWN in Protocol is 2

Interface                         IP Address/Mask      Physical   Protocol
GigabitEthernet0/0/0              192.168.1.254/24     up         up
GigabitEthernet0/0/1              unassigned           down       down
GigabitEthernet0/0/2              unassigned           down       down
NULL0                             unassigned           up         up(s)

# todo AR4:配置环回地址
[R4]int lo 0
[R4-LoopBack0]ip add 4.4.4.4 24- STEP2.0:测试连通性
配置NAT前,先测试网络连通性:
用AR4 ping CNC和CT的地址,即183.165.11.0和61.16.18.0,无法ping通,也ping不通1.1.1.1和2.2.2.2
- STEP2.1:配置NAT
# todo AR3:NAT
[CE]acl 2002
[CE-acl-basic-2002]rule permit source any
[CE-acl-basic-2002]int g0/0/0
[CE-GigabitEthernet0/0/0]nat outbound 2002
[CE-GigabitEthernet0/0/0]int g0/0/1
[CE-GigabitEthernet0/0/1]nat outbound 2002- STEP2.2:测试连通性
配置NAT后,测试网络连通性:
ping通183.165.11.1和61.16.18.1
ping不通1.1.1.1和2.2.2.2
- STEP3.0:AR3配置PBR
# todo 一、AR3使用ACL进行分类
[CE]acl 2000
[CE-acl-basic-2000]rule permit source 4.4.4.0 0.0.0.255
[CE-acl-basic-2000]rule deny source any
[CE-acl-basic-2000]acl 2001
[CE-acl-basic-2001]rule permit source 192.168.1.0 0.0.0.255
[CE-acl-basic-2001]rule deny source any

# todo 二、AR3配置 分类(调用ACL)
[CE]traffic classifier ?
  STRING<1-31>  Name of classifier
[CE]traffic classifier cw
[CE-classifier-cw]if-match acl 2000
[CE-classifier-cw]q
[CE]traffic classifier ot
[CE-classifier-ot]if-match acl 2001
[CE-classifier-ot]quit

# todo 三、AR3配置 动作
[CE]traffic behavior ct
[CE-behavior-ct]redirect ip-nexthop 61.16.18.1
[CE-behavior-ct]q
[CE]traffic behavior cnc
[CE-behavior-cnc]redirect ip-nexthop 183.165.11.1
[CE-behavior-cnc]quit

# todo 四、AR3配置关联分类和动作
[CE]traffic policy PBR
[CE-trafficpolicy-PBR]classifier cw behavior ct
[CE-trafficpolicy-PBR]classifier ot behavior cnc

# todo 五、AR3配置接口下调用
[CE]int g0/0/2
[CE-GigabitEthernet0/0/2]traffic-policy PBR inbound- STEP3.1:测试连通性
AR4使用4.4.4.4ping2.2.2.2通了,192.168.1.254ping1.1.1.1没ping通······
- STEP4:链路检测
PBR问题:即使线路down了,PBR仍然生效
要求:如果某个链路down了,可以通过其他链路到达目的。
# todo AR3:配置链路控制
[CE]nqa test-instance ct icmp  # nqa检测
[CE-nqa-ct-icmp]test-type icmp  # 检测包类型
[CE-nqa-ct-icmp]frequency 10  # 频率,每隔多少秒发一个Hello包
[CE-nqa-ct-icmp]probe-count 2  # 每次发包个数
[CE-nqa-ct-icmp]destination-address ipv4 61.16.18.1  # 检测的目标(地址)
[CE-nqa-ct-icmp]start now  # 开始、结束时间

# todo AR3:配置链路控制
[CE]nqa test-instance cnc icmp
[CE-nqa-cnc-icmp]test-type icmp
[CE-nqa-cnc-icmp]frequency 10
[CE-nqa-cnc-icmp]probe-count 2
[CE-nqa-cnc-icmp]destination-address ipv4 183.165.11.1
[CE-nqa-cnc-icmp]start now
一个技术:超过带宽打标签(整形监管)